
-
Simple Fantastic Kitchen
This post may contain affiliate links. See my disclosure policy.
Is This Mortar And Pestle Worth The Hype?
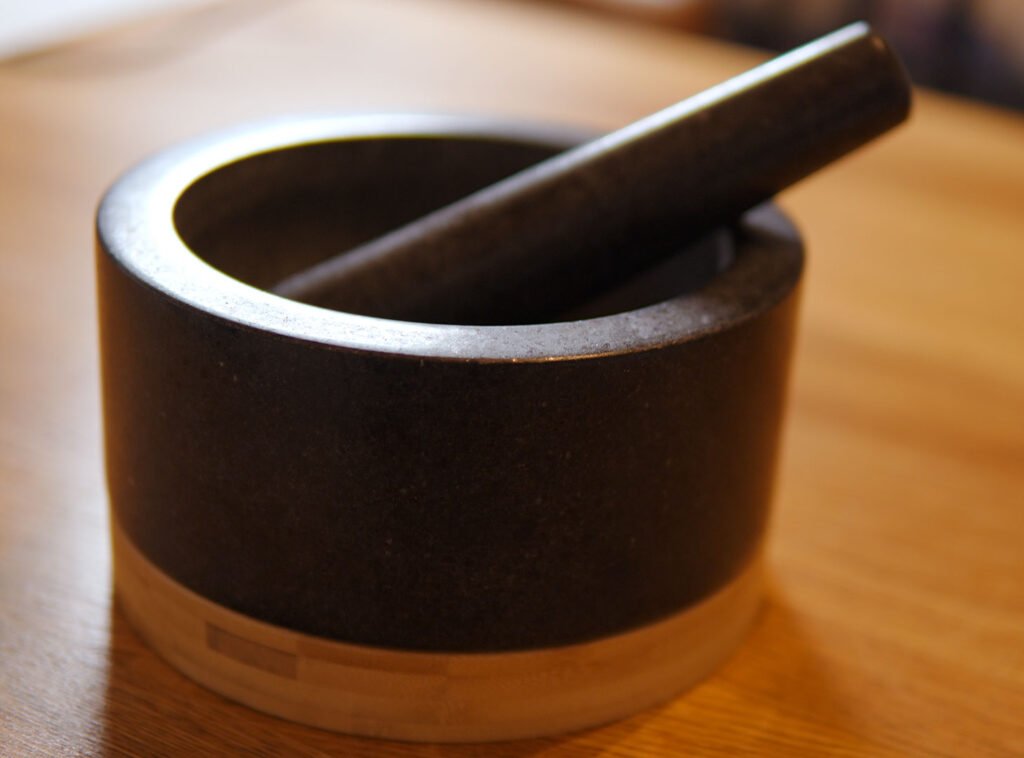
Is this mortar and pestle really worth the hype? It’s got amazing reviews on Amazon, but do they hold up to my testing?
Today, I’m unboxing and reviewing this granite mortar and pestle set with bamboo base made by Priority Chef. If you’ve been curious about getting a mortar and pestle set, then this post is for you.
I’ll be walking you through everything from the unboxing experience to testing this in action with a few simple recipes. And learning how to use a mortar and pestle with the best techniques.
You can watch my detailed video below or read on for the full experience!
Is Any Mortar and Pestle Worth the Hype?
It is said that the act of using a mortar and pestle, the manual crushing and grinding, unleashes flavors and aromas far better than a machine can. Well, I’m looking forward to putting that to the test today, and I’m really excited because I’ve been on the hunt for one of these for a while. I did a ton of research and I landed on this beauty so let’s unbox.
Mortar & Pestle | Unboxing
First we encounter our free gift. This set comes with a BPA free silicone garlic peeler. Next, we find the pestle wrapped up well for safe keeping, then a care guide and an information card on your garlic peeler.
Then we remove the mortar which comes with a sturdy bamboo base, wrapped equally well.
Mortar & Pestle | Specifications
The bamboo base also ensures stability so that it won’t topple while using. I’ve seen some mortars that are a little top heavy and worry me a little bit. Not this one.
This mortar is extra large and holds up to four cups. The mortar and pestle are expertly carved from 100% natural granite.
The interior of this extra large mortar is 2.55 in deep. The total diameter is 7.12 in and the height is 3.9in, including the bamboo base. The pestle is 7.2 in high.
This unit weighs just under 9 pounds, which is excellent for sturdiness. You don’t want one that is too light.
My first impressions are that this is really beautiful, absolutely gorgeous. And I love how there’s some detail in the bamboo. it’s just a little different. It’s just really, really pretty wood.
Mortar & Pestle | First Impressions
My first impression is that this is almost a little piece of art that I’m actually really excited. As long as it works well. I’m really excited to have it on my countertop, just sort of sitting out. It’s just like a beautiful statement piece. I think.
And then the second impression, I’ll tell you, is that it’s heavy, but I can pick it up and move it with ease. I really can, but it’s definitely going to require two hands for me to be steady to carry it. One hand is a little bit like… you’d better be strong! And I could do it, but I wouldn’t want to do it long time. But two handed is no problem.
And, you know, you do not want this to be too light because then it’s going to move around while you’re using it. And you don’t really want that. You want it to be a nice, sturdy piece, but be able to pick it up. So that’s was my hope when I bought this. And you know what? It’s coming true so far. So I’m excited.
And then the other thing I’m noticing is that the bamboo base, it just slides without scratching your countertop, which is honestly amazing, because some of the units that I was looking at… the bottom was rough, unpolished stone. And you do not want that on your countertop. It could really scratch it up big time and I wouldn’t want that.
If a thing is heavy but you can slide it, who cares, right? So that’s really nice.
And then you’ve got this polished exterior which is very smooth to the touch and black in color.
And then the interior is unpolished, It’s rough, which you want. It’s excellent for grinding and pulverizing with ease.
And the next thing I’m noticing is that this pestle is really comfortable in my hand. Smooth all along the exterior. The only part that isn’t smooth is the bottom part, which is great. It’s unpolished so that it will grind better. That’s exactly what you want.
The pestle feels awesome in my hand. Initially, it feels heavy enough to do the job, but not so heavy that it would be cumbersome to do this for a while. Although we’re going to put it to the test in a minute.
Mortar & Pestle | Care Instructions
So inside the care guide, I learned about our next steps before we use the mortar and pestle. These are the steps before the first use only. You do not have to do this in between every use.
So first you should wash the mortar and pestle with warm water but without detergent. Always hand wash these pieces. Never put them in a dishwasher.
So then after the mortar and pestle are dry, you will clean them by adding a handful of white rice and roughly grinding it into the surface with the pestle until the rice is pulverized. It will be discolored at first as the grits and leftover dust combine with the rice. You then discard the rice and repeat this process until the rice grinds white. Again, you do not have to do this after every use.
They suggest for subsequent uses or long term care, Just simply rinse it with water immediately after use. This is to prevent staining and just to keep it sanitary.
And then they encourage you to season the mortar before first use after cleaning it like you might a cast iron pan. So I encourage you to do this as well.
I have already rinsed, cleaned and seasoned my mortar so we are ready to start using it.
We will test it by crushing nuts and spices then make a delicious pesto sauce recipe followed by a delectable guacamole recipe. I’m excited.
Mortar & Pestle | Test 1: Crushing Nuts & Spices
The first thing we’re going to crush is just some whole black peppercorns. So just put a bunch in the bottom of the mortar.
Mortar & Pestle | Technique
Let’s talk about mortar and pestle technique. I like to keep the pestle loose in my hand. Which allows the weight of the pestle to do the bulk of the work. I’m just sort of letting it drop. You’re letting the mortar and pestle do the work for you.
When I use this technique I am able to grind for longer periods of time without stress of strain It makes the whole experience very pleasurable.
And the aroma of the peppercorns that’s opening up is kind of out of this world. It’s awesome.
Now, you’re going to use a pulling motion.. just pull across and that is going to help the grinding beautifully. And now we’re really getting into it.
Now you can do some circular movements with the pestle and really get into the nitty gritty. Again, I’m letting the weight do most of the work. The weight of the pestle against the mortar.
The aroma is gorgeous. It is so fragrant. And so beautiful.
It’s a fine powder at this point and it only took maybe three minutes. It honestly worked so well. And it was really easy. It was a snap to do. It did not take a lot of strength.
So now we’re going to rinse it out. Just give it a quick rinse. .
So we’ve done our peppercorn with success. So now we’re going to try some mixed nuts.
I’m using a little bag of almonds, cashews and pecans. So let’s put those in the mortar. Almonds are, to me, one of the hardest nuts. So this will be very interesting to see how well this does. And for good measure I’m going to throw a couple of macadamia nuts in there as well.
So now let’s get to work. Remember, we’re going to have this pestle comfortable and loosen our hand. We’re not going to work too hard we’re going to let the weight of it drop again.
Well, the almonds are already coming apart immediately. This is amazing. The macadamia nuts are getting just smashed. I’m not going to pulverize them, I’m just going to bring them to the perfect consistency for chopped nuts.
And what did that take me? Two minutes. It was like nothing.
I would use this consistency as a chopped nuts topping for salads, yogurts, ice cream, and more. And that’s where I would stop. But we’re not going to stop there today. We’re going to see how fine we can make this.
Okay, now we’re going to swirl it with the pestle. And now It is almost a little bit of, breadcrumb situation with how fine that is.
And that was what? A couple more minutes. Maybe 4 minutes total to grind it this finely. It’s like a fine meal at this point.
Well, let’s give it a taste, shall we? Oh my gosh, it really does bring out the flavor of it. Okay. That is awesome. Taste wise, it’s somewhere between a nut butter and a topping. I would so happily bread a chicken with this and it would be so delicious. So, we’re going to set the nuts to the side. We’re going to rinse this again. Then now we’re going to move on to our homemade pesto recipe.
Mortar & Pestle | Test 2: Making Pesto Sauce
First we’ll peel four garlic cloves. this came free with the mortar and pestle. it’s just a very basic garlic peeler. So you put your garlic inside. You push down and roll it. Then you drop it out And it did work really well. It worked really well. Look at that. So I’m really happy with the free gift that came with our mortar and pestle. Well done, garlic peeler.
So I’m just going to cut off the ends of the garlic. And then I’m just going to cut the garlic in half. And if there’s a bigger piece I’ll just cut that into a quarter.
Take all of the cloves of garlic and put them in the mortar. Add just a pinch of salt to it. Now we’re going to crush the garlic in the mortar and pestle until it’s paste-like.
So we’re just going to have a loose hand and let it drop. Let the mortar and pestle do the work. Now you can see that it’s kind of turning into somewhat of a paste, but it’s still in pieces. So we’re going to start swirling it. Swirling and dragging.
Again, I am really letting the weight of the pestle do the action here. I’m not working hard at all. which is the fun of it.
It’s very nicely turning into a garlic paste. That took about 1 to 2 minutes to do. Again, really almost no effort on my part, even though it seems like it is. It’s really not. If you get a good mortar and pestle you’re letting the weight of the pestle go down into the mortar. You’re just guiding it.
Next we’re going to take a bunch of basil leaves. And we’re going to add those in, in about 3 to 4 rounds, crushing and pounding down the leaves until they become part of the paste.
Now we add in three tablespoons of pine nuts, one tablespoon at a time. These you are going to pound. Pound them into the paste. Then you swirl. They’re combining really nicely
Next you’re going to finely grate two ounces of the parmesan cheese of your choice. Something in the parmesan cheese family. The easiest way to do this is to grate it on to a scale. By the way, this is a fantastic little scale I’ve had for over five years. I will leave a link below for the scale, as well as all the other products I’m using here in case you want to explore them.
The cheese is, by the way, a very light and fluffy consistency. And that is from shredding it ourselves. When you do store bought shredded cheese, it also has other things in it so that it doesn’t clump. So it does get a little harder. This is so soft and beautiful. So if you’re out of time you can absolutely do store bought. But this is totally preferable.
So as the paste gets thicker, it is a little more work to kind of get things off the sides So you have to be really cognizant to let the pestle be loose in your hand because you’re going to want to muscle it a little bit, and you don’t have to.
Okay, this looks phenomenal. Next we’re going to add in two tablespoons of lemon juice to the paste until it’s fully mixed in. So just a little bit at a time. I mean it’s going to incorporate really quickly.
Now, we’re going to use a half a cup of olive oil and slowly drizzle in small amounts until it’s been fully emulsified into the mixture.
I would say you just have a little spoon handy just to kind of get the stuff off the sides. It’s probably an easier job than trying to make the pestle do all the work. Wow. This looks great.
You know what? I’m going to do a taste real quick. Oh. Oh, my gosh, that is so good. There are so many flavors. It’s like hit after hit after hit. The first was the the cheese and the oil, and then the garlic hit me, the pine nuts. And then the basil. Hit after hit after hit, wave after wave of taste. This is out of this world. This is so good. It’s so fresh. I’ve never had pesto sauce like this. Never.
I can say with confidence that our pesto sauce is ready. I made a little spaghetti squash. So we’re going to add it to that. I recently made a video on how to make this Spaghetti Squash I will leave a link to that recipe below.
And incorporate that pesto sauce into your pasta of choice. That looks perfect. And it tastes so delicious.
It’s like all the tastes are coming alive inside my mouth. I don’t know how else to say it. It’s like springing: basil, garlic, pine nuts, lemon juice, and olive oil. Oh, it is so good. And then the spaghetti squash is so unbelievably delicious.
Next, we’ll make a homemade guacamole recipe with our mortar and pestle.
Mortar & Pestle | Test 3: Making Guacamole
First, we’ll chop one quarter of a white onion. Now, you’re going to chop them as finely as you like your onions chopped inside of your guacamole.
Next, we’ll chop 1 tomato of your choice I am using Kumato tomatoes but roma tomatoes or beefsteak tomatoes are also wonderful… whatever works for you. I just happened to love these, I saw them in the grocery store, so that’s what I’m using today.
Next, we’re going to mince 4 cloves of garlic.
Now, we chop the equivalent of 2 to 3 tablespoons of fresh cilantro.
Then, slice a lime into quarter wedges.
Now, we will chop a green jalapeño pepper. Now, if you don’t like it too spicy, it is very important that you remove all the seeds and the white pith membranes. This is what I will do today, because I am more of a mild to medium gal when it comes to spice preferences. Then chop the green jalapeño pepper.
And now, for the star of our guacamole, we have 3 avocados. It’s very important to get them the right ripeness. For me, I like them soft to the touch so that you can push them in, but they are still a little bit firm.
And by the way, once it’s mashed in there… it’s mashed in. So, as long is it’s fresh it doesn’t have to be a perfect avocado.
All we’re going to do right now is halve them and take the pits out.
Next, we’ll use our mortar and pestle. First, take two avocados into the mortar. Now we bring our pestle back and we’re going to smash the avocados that are inside the mortar. And you’re going to get this as creamy as you like. I like to go really creamy for the first layer of avocado. That is looking so good. Super creamy. Wonderful.
Next we’re going to add the onions, the garlic and the jalapeño pepper and mix them in with the avocado.
Now, if you want, you can come back in with a spoon to scrape the edges.
Now you’re going to add your last avocado. Scooping out the avocado allows you to get every last piece of it right into the bowl.
Now we’re going to smash this but we’re not going to do it quite as much. I like to have just a little bit of chunk for my final avocado. Just a little bit just to give some texture.
Now, you will want to add the tomatoes and the cilantro. And you’re going to sort of gently stir these in with your spoon.
Now we’re going to squeeze two of the lime quarters over the dish Get all that beautiful lime juice in there. You also could halve it. If you have a lemon juicer or a lime juice squeezer, you could cut it in half and do it that way, too.
Now we’re going to add a pinch of salt. And I’m going to be very generous. Now we stir again. And for me this presentation is so gorgeous. Just leave it on the table in the mortar (removing the pestle), have a little plate of chips by the side and just use this as your guacamole bowl.
I have to take a taste right now. Oh. Oh, wow. Oh, wow. That is so good. Oh. I’ve never had guacamole like this. This is so fresh. It’s so awesome. The mortar and pestle is a game changer. This is amazing. You have to try this because I think you probably think I’m exaggerating, and I am not.
It’s like wave after wave after wave of flavor hits you. Each individual ingredient keeps hitting you in a different way than when I’ve ever had guacamole before. It’s the best guacamole I’ve ever had. This was beyond my expectations. And it’s really not too spicy. There’s just a beautiful kick, but it’s not too spicy.
Mortar & Pestle | Final Review
So what’s my verdict on this mortar and pestle? Is this mortar and pestle really worth it? I say absolutely yes.
For me, this is a little work of art that sits on my countertop. I love looking at it every day. And in addition to that, it is so functional for so many jobs.
It’s really fun to use, and it brings out the aroma and taste in such a different way than any of the products that I have in my kitchen.
I think it’s absolutely wonderful. And I recommend it highly. For me, this is a keeper.
This mortar and pestle, as well as all the other products seen in this video, are linked below, in case you want to explore them. The full recipes from today are also linked below. Thanks for joining me and I’ll see you on the next one!
RECIPE LINKS BELOW⬇️
🛒 Links to products found in this video:
Vera Bradley Apron (Color: Rose Toile)
🍽️ RECIPES found in this video:

Hi, I’m Allison, the founder of Simple Fantastic Kitchen. I live in the mountains in a tiny house with a tiny kitchen where I make