
-
Simple Fantastic Kitchen
This post may contain affiliate links. See my disclosure policy.
Spice Organization | How to Set Up?
Today, I’m going to show you how to transform your spices from messy, unworkable clutter to organized happiness. And once you set up this spice organization system, you won’t turn back.
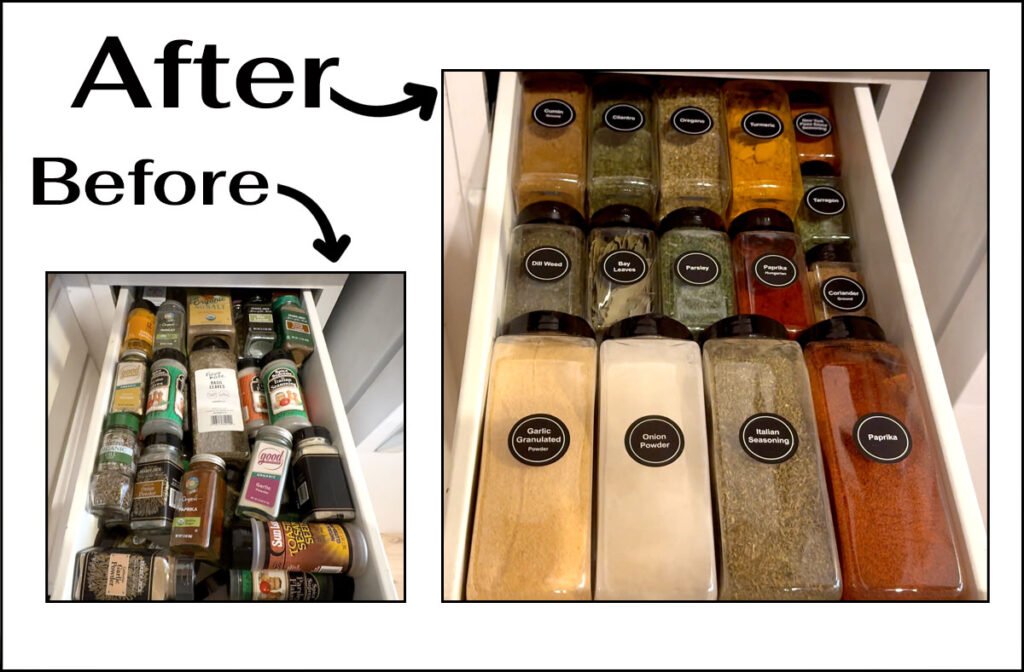
You can watch my detailed video below or read on for the full experience!
There are so many ways you can accomplish spice organization. Most, spice organization systems I find a little impractical. They only account for standard sized spices, beautifully arranged, but impossible to maintain. And what happens when you buy bulk sized spices? Do those live in a separate area from your beautiful spice drawer?
How could I incorporate all of my spices into something appealing and functional? How to avoid looking bulky and jumbled and create something with multiple sizes that still feels cohesive? How to set up a spice organization system that really makes sense?
I set out to create a system that could do just that. My inspiration for this system is my own completely unruly spice drawers (pictured above on the left). Two layers deep, spices stacked on top of spices. I usually don’t even realize I have the spice I need.
After I bought another turmeric, thinking we were out, only to find we had three brand new already, I knew it was time to get down to business and set up a spice organization system.
Spice Organization | 4 Step System
I created a four-step spice organization system that covers everything in detail. And you’ll want to stick around till the end where I’ll show you the crucial last step in making sure your spices are fully functional.
And by the way, this spice organization system works for tiny kitchens like mine, larger spacious kitchens, and everything in between. So, let me show you my four-step spice system.
Spice Organization | Step 1: Take Inventory & Measure
Step number one: take inventory and measure for your spice organization system. Have a bare kitchen counter or tabletop. Remove all the spices from the drawers and place them on your countertop.
Now, measure the drawers. Be sure to get the width, depth, and the height you have to play with.
Then, clean the drawers thoroughly.
Now, on the countertop, put like spices together into groups so we can see how much we have of each spice. I have a large quantity of most of my spices. Yes, I have overbought, but these are all spices I use pretty regularly.
So, part of my system is to find larger spice containers, then marry all the different bottles of one unique spice into one larger container.
Empty spice jars are easily available online and come in a few different sizes by fluid ounce. I opted for BPA free food grade plastic as I need them to be as lightweight as possible. They will be living in drawers after all.
I opted for empty containers in fluid oz for 4 oz jars , 9 oz jars, 16 oz jars, and 32 oz jars. These all have black multi-purpose screw on caps, and it makes them feel uniform even though they’re in different sizes. With the multi-purpose caps, you can open one side and pour, then open the other side and shake out your spice.
So, how did I determine what sized containers I would need? Interestingly, it wasn’t by looking at the label of the store-bought spice. There are ounces written there, but those are measured by weight and not by volume. We need to measure by volume. So, how do we do that?
Well, I will tell you what I did. I took a large, Costco sized bulk container and found the volume by pouring one directly into a measuring cup. I had to do it in two rounds because my Cuisinart Measuring Cup only goes to 16 fluid oz. So, I filled it to 16 oz, then filled the remainder of the spice into the measuring cup and got 8 extra oz. So, the Costco bulk sized container measures 24 fluid oz. That’s great info to have.
I did the same for a standard sized spice container and those are typically 4-5 oz.
So, if you do this measuring for every vastly different size store-bought container you have, you will know the volume for that sized container, and you can estimate for the others.
And you should be aware the empty spice containers do give a little wiggle room. So, the 4 oz empty container I bought should hold any standard size spice.
As we start to inventory, be sure to check your spice’s expiration dates. If they’ve expired, go ahead and throw them away.
Next, get a sheet of paper or write on your computer. A spreadsheet is excellent for this.
Now, make four columns, one for each sized container. 4 oz, 9 oz, 16 oz, and 32 oz.
Now, go through your spices. Inventory each kind of spice you have and estimate the total number of ounces for that spice. Then, write that spice down in the column with the appropriate sized container.
For instance, I estimate that I have 24 ounces of bagel seasoning (Costco Container) plus two more jars that are standard size. So that puts it right at about 32 ounces. So I will put Bagel Seasoning in the 32 oz column.
After you have your complete list together, you will have a great idea of the quantity you will need of each sized container.
Now, we have to see how many will fit in each drawer. The dimensions for each size container is available online.
Even though these containers sit flush against each other, it’s good to allow a little extra room when planning on how they will fit inside your drawers. But in general, you can take your dimensions and divide them by the thinnest side of the container if that side fits in your drawer height-wise.
Just go row by row and see how many of each spice you can fit. I recommend not stacking your spices. After all, that’s how I got into this mess in the first place.
Spice Organization | Step 2: Get Containers
Now, it’s time for step two. Get your containers and accessories. Let’s order the correct number of empty spice containers in the appropriate sizes.
And let’s order a few other helpful items, including These Wonderful Spice Labels. They have hundreds of different spices and empty labels just in case they don’t have a spice listed.
I’ll also get This Nice White Pen Set with varying sized writing tips, This Wonderful Funnel Kit, and This Great Gorilla Grip Non-Adhesive Drawer Liner.
When my spice jars and accessories arrive, the first thing to do is dry fit them into the drawers to make sure my calculations are correct. And everything looks great.
Now it’s time to clean them. I thoroughly wash the spice bottles and lids. I’m using a wonderful bottle brush that helps me get into all the nooks and crannies. Then lay everything out to dry.
By the way, most of the lids have a freshness seal, which you can use if you’d like. I wipe all of them down with a Lysol wipe, then store them for potential use later.
I also wash and dry the funnel kit I bought. I tried to use the funnel I already owned, and it didn’t work so well. I needed a larger opening for the spices. I found this funnel system with multiple sized heads that just screw on. I’m very happy to have it. It has some canning and straining heads as well, so it’s very versatile.
Spice Organization | Step 3: Fill & Label Spices
Now, it’s time for step three. Let’s fill and label our spices. And let’s start by filling a 32 oz container with onion powder. I will use my new funnel for this.
When dealing with really powdery spices like onion powder, feel free to place down a cloth first, unless you want to season your tabletop.
Now, one thing you will encounter when marrying your spices is that different brands may have slightly different colors of spice. This is fine. You can either shake up the spice to combine it perfectly, or use a spoon to mix it together. Either one of these usually does the trick.
In terms of the funnel, I’m just going to rinse it out in between uses and thoroughly dry it by hand with a paper towel. Unless you’re dealing with a really hot spice, I think rinsing it enough and soaping between spices is probably unnecessary and time consuming. Just make sure it’s totally dry before you do the next spice.
For now, I’m going to keep off the freshness seals because I normally take them out like when I open a new seasoning container. But I really appreciate them including it as an option. And I did save mine in a ziplock bag, stored for potential later use. (You never know!)
And now the last part is going to be to put the label on the side. I recommend putting the labels directly in the center of each jar, making sure you will be able to read the label when it’s in the spice drawer.
Just take the onion powder sticker off and affix it to the spice jar in the center. It looks so pretty.
So, next up, we’re going to do 32oz container with Italian Seasoning. After we fill it, we will use the onion powder as a template for label placement.
I’m placing the onion powder right next to the Italian seasoning. Then, I’m using a cereal box as a straight edge so that the bottoms of each container are exactly in line. That way, I have the best shot of matching the placement of the labels as I affix them.
Put the label smack in the middle so they’re right next to each other. The result is so pretty.
We will repeat this action for all the 32 oz jars. Then start in on the 9 oz jars. For the first spice (I’m doing Bay Leaves) fill the 9 oz jar, then find the best spot in the middle of the jar. Put the “Bay Leaves” label on in that spot. Then, on your next 9 oz spice, use the Bay Leaves as a template for where the sticker goes, using a cereal box or other straight edge as your guide at the bottom of the jars.
Repeat this for the remainder of the 9 oz jars, the 16 oz jars and the 4 oz jars until you have finished filling and labeling all your spices.
If you have spices that aren’t on the hundreds of spices listed, you can always use the white writing pens to write on the blank spice labels provided. I did this for the Bagel Seasoning and I’m so happy with how it turned out. I also had a No Salt Seasoning that I hand-wrote as well. So glad to have the option.
As a note, l uses the 1.0 fine point white gel pen to write the word “Bagel” and the .6 fine point to write the word “Seasoning” on the blank labels. Just give it a couple of minutes to dry before applying the label.
Although, I must say, it’s very rare that you will need to write anything in. On the labels I found so many different kinds of Curry, Saffron, Hungarian Paprika (and regular Paprika), Chinese 5 Spices, Ras El Hanout, and so many more. They have so many choices and the labels are so pretty, they really bring everything together in terms of giving the different sized jars a cohesive look.
Spice Organization | Step 4: The Spice Drawer
And finally, we’re ready for step four, the spice drawer. First, we take the non-adhesive liner and cut it to fit the drawers. I’m using this wonderful Gorilla Grip brand. It will protect the spices nicely.
Once you’re sure it fits, use your first drawer liner as a template for your other drawers. Because the width of my drawers are just a little under the 12-in width of the liner, I won’t cut the width, but instead just allow it to come up a little on the sides, being sure to press it down snugly into the corners so it stays in place.
I will fill the drawer now. Once the spices are all in, I can see I have a 1 and 1/2 in gap right at the top. This is significant and allows for major spice sliding when the drawers open and close. I’m hoping the liner will stop the spices from moving. Let’s test it.
Well, it still moved too much. With all the movement, you can’t see the labels on the back spices, which just will not work.
But I have a solution: Spacers.
I recommend going to the baseboards and trim section of your local hardware store. My hardware store has the perfect 11/16 x 1 5/8 pine board that they sold me in a two ft section for less than $5.
The gap I have is 1 and 1/2 inches. So, I had them trim it down to 1 and 1/4 inches. You need 1/4 in of wiggle room to get the spices in and out easily.
Then I gave them the width of my drawers and asked them to go just slightly under that, like less than 1/16 of an inch.
To put the spacer in, first we take the back spices out. Then put the spacer all the way in the back. Put the spices back in and check the fit. Looks good really good.
Let me close the drawer and open it again. It’s a perfect fit. Just the teeniest little gap, not even noticeable. And you can see the labels in the back perfectly.
Now I can easily take my spices out and put them back in again.
In terms of spice placement, it’s very difficult to do it alphabetically because of the different sizes. So I like to do it aesthetically, putting the spices I use most in the top spice drawer.
And might I add, putting the 9 oz shorter spices in the middle helps me to get a good grip on each spice. You will find your own placement in your drawer because my drawers are very small. So, you might have a little more room in your drawers where your spice placement works better for you another way. This is what works for my drawers.
I did have to dedicate a third tiny nearby drawer for 12 of the 4 oz spices. I put the liner in, then arranged them. I also got clever with the spacers for this. I’m using the tiny empty saffron jars at the very back where they can’t be seen, and they fit perfectly.
I am so happy with how my spice drawers turned out. Thanks so much for spending this time with me and my spices. I’ll see you on the next one!

Hi, I’m Allison, the founder of Simple Fantastic Kitchen. I live in the mountains in a tiny house with a tiny kitchen where I make